Running 512 containers on a laptop

LXC is a management system for lightweight virtual machines called containers.  LXC relies on the Linux kernel for several key features including process isolation and resource limitation.  Compared to virtual machines, LXC containers have a few limitations, however none of them affect the vast majority of use cases.

My laptop (Thinkpad X220) is by no measure a speed demon, although it still has the required resources to host a seemingly arbitrarily large amount of containers thanks to a few key deduplication technologies.  Kernel Samepage Merging or KSM allows fragments of memory with identical contents to be merged together, thus freeing up memory for other uses.
IRSSI Push notifications to GNOME desktop and Android device

IRSSI configuration

Install these scripts into $HOME/.irssi/scripts (and symlink it in $HOME/.irssi/scripts/autorun) to have them autoloaded when IRSSI starts.

Android configuration

Sign up for a notifo account, download the android app, and sign in with it. Make note of the username and API key, as you’ll be configuring irssi to use them.

You’ll be loading the scripts in IRSSI and setting 2 notifo parameters:

/script load screen_away.pl
/script load socketnotify.pl
/script load notifonotify.pl
/set notifo_username $USER_NAME
/set notifo_api_secret $API_KEY

Now receiving highlights while you’re away (detached from the screen) will send them to your android device.

Ganeti, dealing with node failure

  • Get paged
  • Stop panicking
  • Be sure to log into the broken node to verify it actually died. If the VMs are still running correctly on it, and it’s simply a networking problem, if you proceed to bring them up again you will encounter a bad state known as ‘Split Brain’. This is difficult to recover from, so please verify the dead node is truly dead.
  • If there is more than 1 node left, try logging into the cluster IP (kvm.infra.scl1.mozilla.com vs kvm1.infra.scl1.mozilla.com)
  • If there is only 1 remaining node, voting won’t work, so ganeti-masterd will have to be started by hand:
root@vm1-1:~# ganet-masterd --no-voting

Once your master node is online, we need to set the failed node to Offline mode.

Updated mirror for Netwalker Lucid Image

Additionally, I will be adding the Maverick images as soon as I’ve uploaded it, and have an updated Lucid image to improve stability.

Sharp Netwalker Ubuntu Lucid Image

I wanted a recent Ubuntu distribution though, which I couldn’t find provided for me online. So I rolled my own, and am reasonably pleased with the results. All of the hardware works, although there are some annoyances, such as no battery meter in the GNOME notification area, and the wireless card isn’t supported by NetworkManager, although still works with iwconfig and wpasupplicant. Additionally, the hotkeys on the top are not bound to any programs.

Upgrading GuruPlug Kernels

After a failed flashing attempt(don’t attempt to tftp flash u-boot.kwb from within U-Boot!) I needed to use JTAG combined with the included JTAG adapter.  To do this, make sure that the UART cable is unplugged, and the JTAG cable is plugged in(unplug/replug the USB adapter just to be safe). First grab the guruplug-installer package, then grab a known-good copy of U-Boot.

$ cd Downloads/
$ tar zxvf Guruplug-installer.tar.gz
$ cd guruplug-installer
$ sudo ./runme.sh ../uboot.guruplug.bin
(lots of scrolling text)

At this point U-Boot is restored, and all that’s needed is to upload a new kernel(and maybe rootfs). Your old kernel won’t work with this new version of U-Boot, so make sure that you have a kernel compiled and ready to use. If you don’t feel like patching(and manually fixing the failed patches) I’ve provided a 2.6.34 kernel for you, complete with modules. To upload the new kernel you’re going to need to attach your GuruPlug to your network with it’s top-facing ethernet interface(near eSATA port).

Defcon Badge Hackery

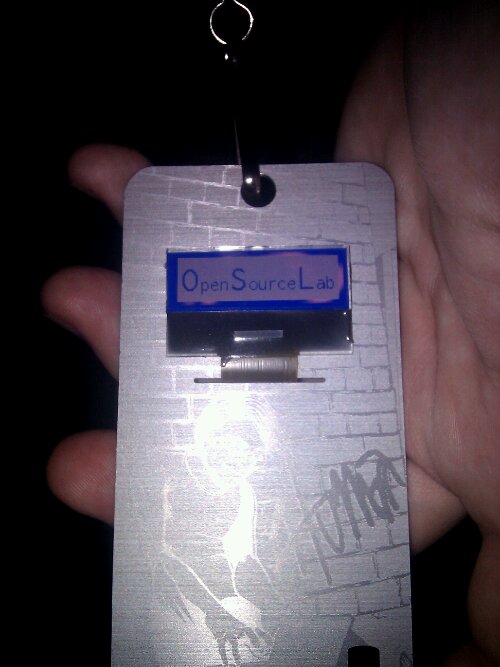
Photo

Some of the OSUOSL employees attended the recent DefCon 18 conference.  One of the more uncommon features was the conference badge.

In addition to being a ticket for entry into the conference,  it’s also a hackable piece of hardware complete with 128×32 LCD screen, and microprocessor.  The source code for the badge is available online.

Corbin Simpson, a developer at the OSU Open Source Lab spent a large portion of his time at the conference developing and uploading new software onto his badge.  His first badge hacking project was to upload new images to show his appreciation for the lab.

Restoring GuruPlugs

At which point I decided I wanted to try to restore the original kernel, so that I would at least have a working system with which to test.  Therein lied the rub.  The files posted here are completely broken.

Thankfully, a friend of mine also ordered a GuruPlug.  So I grabbed his images. Here’s how to ACTUALLY restore your GuruPlug if you flash a bad kernel to it.

Download the extracted uImage.  This was created by the command ‘dd if=/dev/mtdblock1 of=uImage’.