Osuosl

Sharp Netwalker Ubuntu Lucid Image

I wanted a recent Ubuntu distribution though, which I couldn’t find provided for me online. So I rolled my own, and am reasonably pleased with the results. All of the hardware works, although there are some annoyances, such as no battery meter in the GNOME notification area, and the wireless card isn’t supported by NetworkManager, although still works with iwconfig and wpasupplicant. Additionally, the hotkeys on the top are not bound to any programs.
Upgrading GuruPlug Kernels

After a failed flashing attempt(don’t attempt to tftp flash u-boot.kwb from within U-Boot!) I needed to use JTAG combined with the included JTAG adapter.  To do this, make sure that the UART cable is unplugged, and the JTAG cable is plugged in(unplug/replug the USB adapter just to be safe). First grab the guruplug-installer package, then grab a known-good copy of U-Boot.

$ cd Downloads/
$ tar zxvf Guruplug-installer.tar.gz
$ cd guruplug-installer
$ sudo ./runme.sh ../uboot.guruplug.bin
(lots of scrolling text)

At this point U-Boot is restored, and all that’s needed is to upload a new kernel(and maybe rootfs). Your old kernel won’t work with this new version of U-Boot, so make sure that you have a kernel compiled and ready to use. If you don’t feel like patching(and manually fixing the failed patches) I’ve provided a 2.6.34 kernel for you, complete with modules. To upload the new kernel you’re going to need to attach your GuruPlug to your network with it’s top-facing ethernet interface(near eSATA port).

Defcon Badge Hackery

Photo

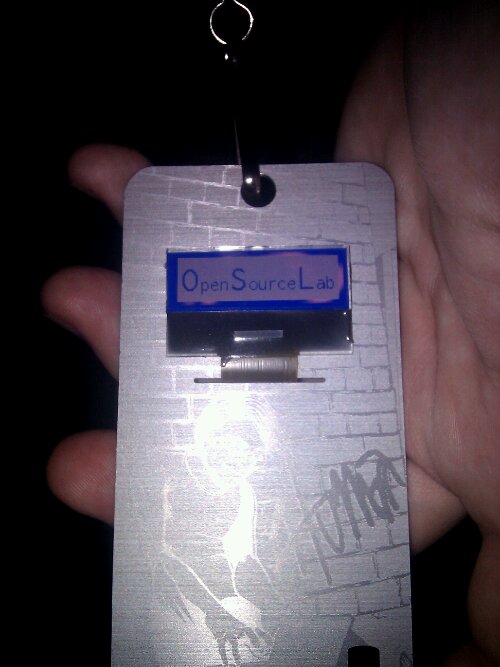
Some of the OSUOSL employees attended the recent DefCon 18 conference.  One of the more uncommon features was the conference badge.

In addition to being a ticket for entry into the conference,  it’s also a hackable piece of hardware complete with 128×32 LCD screen, and microprocessor.  The source code for the badge is available online.

Corbin Simpson, a developer at the OSU Open Source Lab spent a large portion of his time at the conference developing and uploading new software onto his badge.  His first badge hacking project was to upload new images to show his appreciation for the lab.

RouterStation Pro OpenWRT upgrade

The RouterStation Pro comes preloaded with a relatively old installation of OpenWRT Kamikaze.  Being a sucker for bleeding-edge software, I definitely wanted to check out code from the main Subversion repository to get it up-to-date as far as development goes.  Here’s how I did it.

bkero@ponderosa ~ $ svn co svn://svn.openwrt.org/openwrt/branches/backfire
bkero@ponderosa ~ $ cd backfire
bkero@ponderosa ~/backfire $ make menuconfig

Now you select some options to specify that we are building an OpenWRT image for a RouterStation Pro:

Part III: Munin[node] in cfEngine

A tarball of all relevant files can be found here.

All files are hereby released under the GNU Public License version 2, and are apparently copyrighted by Oregon State University.

There are 2 major parts to this system. The first is the cf.classes file, which simply describes which hosts belong in each class. The relevant classes are as follows:

service_munin_host  = ( larch )
service_munin_node  = ( binhost columbia coos fir fraxinus g1 g2 g3 g4 )
package_munin_node  = ( service_munin_node www_phpbb_com )

The second part is the cf.munin file, which holds all the rules that each host should follow. Included are several support files that do such things as generate the munin.conf file, since that is difficult to do by hand.

Part II: The Munin-master

First off, you’re going to have to install the munin package. You’ll also need to have a web server installed, I prefer apache:

# For Gentoo,
emerge munin apache
# For CentOS/Fedora
yum install munin apache
# For Debian
aptitude install munin apache

Gentoo and CentOS both install the HTTP root in /var/www/localhost/htdocs/munin. After setup, the graphs will be available at http://localhost/munin

Debian requires a bit more attention. Debian munin installs the HTTP root in /var/www/munin. so after the setup, a vhost will have to be created to access it. To do this(on Gentoo) I created an apache vhost file, /etc/apache2/vhosts.d/08_munin.conf. On Debian, the file is the same but the path is different, /etc/apache2/sites-available/08munin

Part I: Setting up Munin-Node

Munin showed the most promise and compatibility with many of the services we run at the OSL, such as memcached and varnish. I liked how the plugin system is set up independently on each host, and that each plugin can be managed, configured, and consolidated through symlinks.

For the benefit of the uninitiated the setup on each node goes something like this:

#For gentoo
emerge munin
#For Fedora/CentOS
yum install munin-node
#For Debian/Ubuntu
apt-get install munin-node

Each client is a “node”, and runs the daemon ‘munin-node’. It’s configuration file exists at /etc/munin/munin-node.conf. This file merely tells the daemon which user to run as, which interface/port to listen to, where to log, and which munin masters are allowed to poll statistics.